Chrome Extensions Codelab
Getting started building Chrome extensions as seen at the January 2015 meetup at GDG Oakdale.
View the Project on GitHub justinribeiro/chrome-extensions-codelab-gdg-oakdale
Welcome!
This codelab is designed to help you learn about building Chrome extensions. During this lab, we're going to build a basic issue tracking extension that talks to the Github API to retrieve issues within one of your repos.
Things we'll use
Documentation! You can never have enough of it and during this codelab you may find yourself looking for one more method to go that extra mile. Docs you may find useful include:
Autocomplete / Intellisense is often a developers best friend. You have a few options depending on your editor of choice when developing with Chrome Extensions APIs:
Getting started
First, let's start by creating a directory for our extension:
➜ ~ mkdir my-magical-extension
➜ ~ cd my-magical-extension
Next, we need to create the basic building blocks of our extension. To do that, we need to create a manifest.json file:
➜ ~ touch manifest.json
The manifest.json file defines important information about our extension (see manifest.json documentation). From permissions to versioning, without a manifest.json file, Chrome doesn't know what to do with the rest of the code we'll write. We're going to start by adding some basics to our file. In your editor in choice, open the manifest.json file and add the following:
{
  "manifest_version": 2,
  "name": "My Assigned Issues",
  "version": "1.0",
  "icons": {
    "64":"img/icon-64px.png"
  }
}
Don't have icons? No worries! There are some icons in the repo in the step-01 folder. Download them and drop them in.
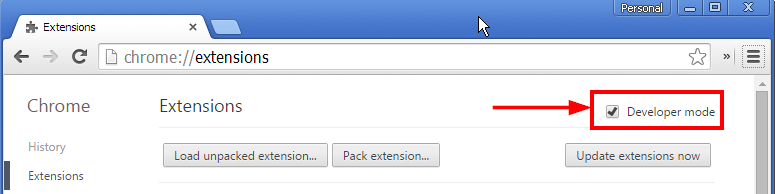
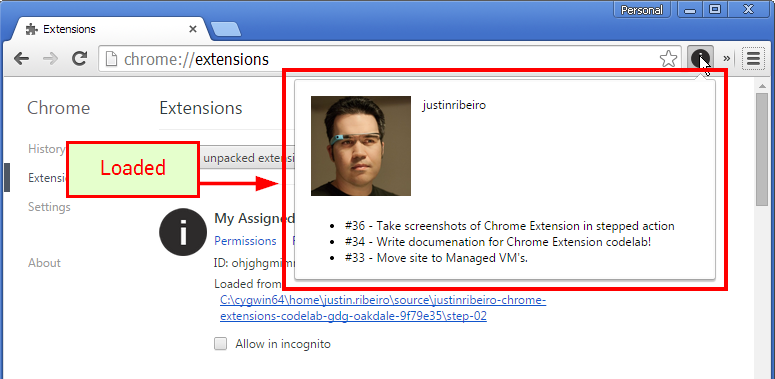
Look good? Great! Let's test our extension in Chrome. To load our extension, we need to enable Developer Mode on chrome://extensions/ by using the checkbox:
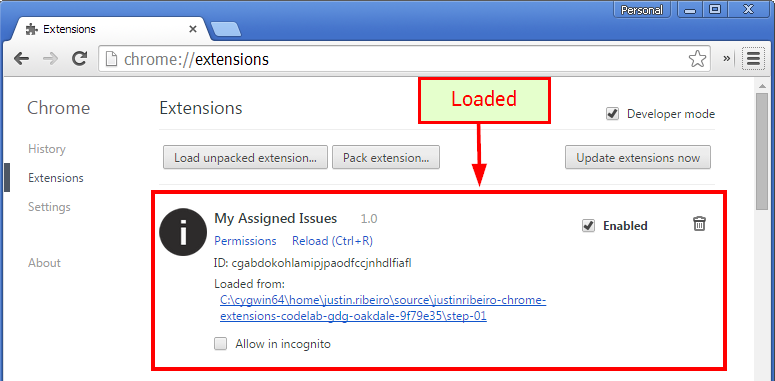
Now, use the "load unpacked extension..." button and location your project folder. If all is successful, you should see the extension loaded:
Great! Every extension needs a toolbar icon however, so let's add one shall we? Remember all those icons we downloaded? Let's use the browser_action attribute in our manifest.json file to add
{
  "manifest_version": 2,
  "name": "My Assigned Issues",
  "version": "1.0",
  "icons": {
    "19":"img/icon-19px.png",
    "38":"img/icon-38px.png",
    "64":"img/icon-64px.png",
    "128":"img/icon-128px.png"
  },
  "browser_action": {
    "default_icon": {
      "19":"img/icon-19px.png",
      "38":"img/icon-38px.png"
    }
  }
}
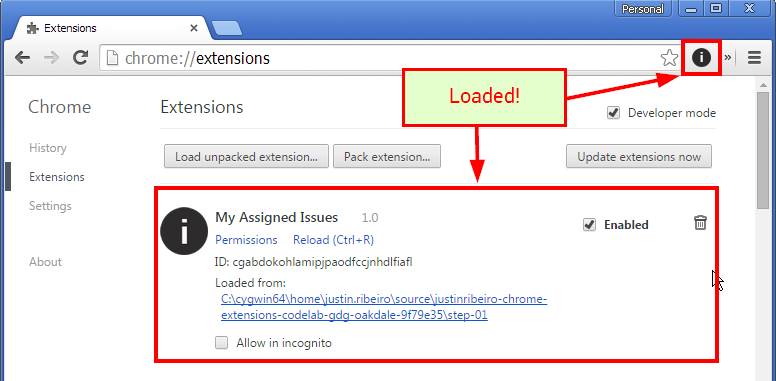
After making the update to our manifest, we can reload the extension to test the change using the "Reload" link under extension details. After reloading, we should now see our browser icon:
We're on our way.
Stuck? Check the step-01 folder for a solution.
Display issues with a popup
Icons are all fine and dandy, but we want our extension to show issues. To do so, we need a popup.html file. Let's create one:
➜ ~ touch popup.html
Again, we have to update our manifest.json to add a new attribute, default_popup, to our browser_action:
{
  "manifest_version": 2,
  "name": "My Assigned Issues",
  "version": "1.0",
  "icons": {
    "19":"img/icon-19px.png",
    "38":"img/icon-38px.png",
    "64":"img/icon-64px.png",
    "128":"img/icon-128px.png"
  },
  "browser_action": {
    "default_icon": {
      "19":"img/icon-19px.png",
      "38":"img/icon-38px.png"
    },
    "default_popup": "popup.html"
  }
}
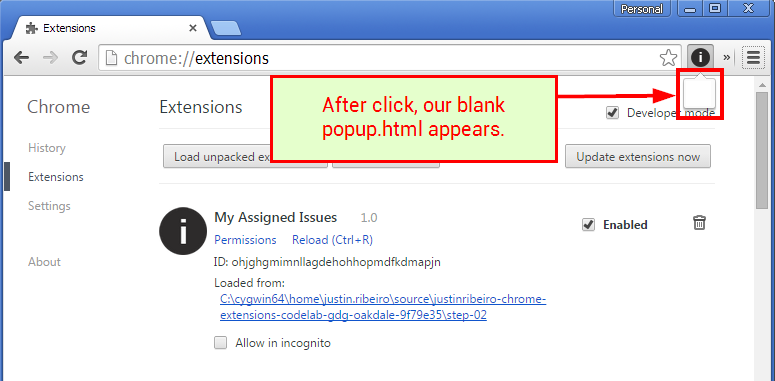
We can verify that things are working by reloading out extension and testing the popup:
Great! Now let's add some structure to our popup.html:
<html>
<head>
    <meta charset="utf-8">
    <title></title>
    <link rel="stylesheet" href="css/popup.css">
</head>
<body class="container">
  <div>
    <div id="user-props">
      <div id="avatar"></div>
      <div id="username"></div>
    </div>
    <ul id="issues"></ul>
  </div>
  <script src="js/github_api.js"></script>
  <script src="js/popup.js"></script>
</body>
</html>
Let's also add a couple of files so we can do some additional work:
➜ ~ touch js/popup.js
➜ ~ touch css/popup.css
The popup.js is important; all our application code is going to run within this file. With Chrome Extentions, we can't use inline script code within our html.
You may notice that in the html structure, there is reference to a couple of JavaScript files (namely github_api.js). This library takes care of some heavy lifting when talking to the Github API.
Our github_api.js library has two methods that we can make use of for the purpose of this codelab:
/**
*
* Get who I am
*
* @param {String} token
* @return {Promise}
*/
GitHub.getMe(token)

/**
*
* Get my assigned issues
*
* @param {String} token
* @return {Promise}
*/
GitHub.getMyIssues(token)
Tip: You don't have to paste that code block into your popup.js; it's only the definition of the method. Keep reading below for more code!
To use the file, make sure you download and add the file to your project. You cannot use external resources. You can obtain that file from the repo in the resources directory.
Once added, we can begin writing code within popup.js to handle talking to the API:
// Get one: https://github.com/settings/applications
var myToken = 'YOUR_PERSONAL_TOKEN';

GitHub.getMyIssues(myToken).then(function (issues) {

  // {array of object} issues
  // definition: https://developer.github.com/v3/issues/#list-issues
  //
  //  YOUR CODELAB TASK:
  //    loop over issues and append list item(s)
  //

});

GitHub.getMe(myToken).then(function (me) {

  // {object} me
  // definition: https://developer.github.com/v3/users/#get-the-authenticated-user
  //
  //  YOUR CODELAB TASK:
  //    set username and avatar in DOM
  //

});
Some important things to note:
- You'll need to generate a personal access token from your Github user via the applications page.
- The GitHub.getMyIssues method will only return tickets you assigned to. If you want to expand that, you can modify the method with paramters via the Github v3 API documetation (see List Issues)
- Remember, our Github library returns Promises.
While having our name is cool, let's go a step further and load our avatar image. Remember, because of Content Security Policy, we can't just load resources as we want. Instead, we need to use cross-origin XMLHTTPRequests to fetch and then serve them via blob: urls:
GitHub.getMe(myToken).then(function (me) {
  username.textContent = me.login;

  var xhr = new XMLHttpRequest();
  xhr.open('GET', me.avatar_url, true);
  xhr.responseType = 'blob';
  xhr.onload = function(e) {
    var img = document.createElement('img');
    img.src = window.URL.createObjectURL(this.response);
    document.getElementById('avatar').appendChild(img);
  };
  xhr.send();

  });
But this still won't work. We need to add permissions for that domain to our manifest.json:
{
  "manifest_version": 2,
  "name": "My Assigned Issues",
  "version": "1.0",
  "icons": {
    "19":"img/icon-19px.png",
    "38":"img/icon-38px.png",
    "64":"img/icon-64px.png",
    "128":"img/icon-128px.png"
  },
  "browser_action": {
    "default_icon": {
      "19":"img/icon-19px.png",
      "38":"img/icon-38px.png"
    },
    "default_popup": "popup.html"
  },
  "permissions": ["https://avatars.githubusercontent.com/"]
}
Finally, to make things a little more viewable in our window, let's add some basic CSS:
body {
    width: 400px;
}

#user-props {
  display: flex;
}

#user-props div {
  padding: 0.5em;
}

#avatar {
  flex-grow: 0;
}

#avatar img {
  max-width: 100px;
}

#username {
  flex-grow: 2;
}
After we've completed your implementation, reload the extension with Ctrl+R or the Reload link and we should have some data loading in our popup:
Stuck? Check the step-02 folder for a solution.
Updates in the background
Clicking a button is so 2002. Let's update our extension to update in the background without having to click our icon.
First, let's create a background.js file:
➜ ~ touch js/background.js
Now we need to make Chrome aware that it will run in the background by updating our manifest.json:
{
  "manifest_version": 2,
  "name": "My Assigned Issues",
  "version": "1.0",
  "icons": {
    "19":"img/icon-19px.png",
    "38":"img/icon-38px.png",
    "64":"img/icon-64px.png",
    "128":"img/icon-128px.png"
  },
  "browser_action": {
    "default_icon": {
      "19":"img/icon-19px.png",
      "38":"img/icon-38px.png"
    },
    "default_popup": "popup.html"
  },
  "permissions": ["https://avatars.githubusercontent.com/"],
  "background": {
    "scripts": ["js/github_api.js", "js/background.js"]
  }
}
Note, we've also added our github_api.js library, as we'll be accessing that libraries methods from background.js.
Tip: You can debug background pages by clicking "background page" on the "Inspect views" list on chrome://extensions/ page. It's the Chrome DevTools you know and love.
We're going to also take a preemptive step and add the storage permission to our manifest.json:
{
  "manifest_version": 2,
  "name": "My Assigned Issues",
  "version": "1.0",
  "icons": {
    "19":"img/icon-19px.png",
    "38":"img/icon-38px.png",
    "64":"img/icon-64px.png",
    "128":"img/icon-128px.png"
  },
  "browser_action": {
    "default_icon": {
      "19":"img/icon-19px.png",
      "38":"img/icon-38px.png"
    },
    "default_popup": "popup.html"
  },
  "permissions": ["storage", "https://avatars.githubusercontent.com/"],
  "background": {
    "scripts": ["js/github_api.js", "js/background.js"]
  }
}
Adding this permissions will allow us to use the Chrome.Storage API to store data that we can access in our extension.
First, let's go ahead and create an interval and function to get our issues in background.js:
function updateIssues() {
  GitHub.getMyIssues(githubToken).then(function (issues) {
    // YOUR CODELAB TASK:
    //    Process results and store
  });
}

// Grab issues every 5 minutes
setInterval(updateIssues, 5 * 60 * 1000);
updateIssues();
Similarly, let's get updates to our user data every 60 minutes:
function updateUser() {
  GitHub.getMe(githubToken).then(function (me) {
    //  YOUR CODELAB TASK:
    //    Process results and store
  });
}

// Grab issues every 60 minutes
setInterval(updateUser, 60 * 60 * 1000);
updateUser();
To store those results, you can use chrome.storage.local.set():
// Get one: https://github.com/settings/applications
var githubToken = "YOUR_PERSONAL_TOKEN";

function updateUser() {
  GitHub.getMe(githubToken).then(function (me) {
    chrome.storage.local.set({
      user: me
    });
  });
}

function updateIssues() {
  GitHub.getMyIssues(githubToken).then(function (issues) {
    chrome.storage.local.set({
      issues: issues
    });
  });
}

setInterval(updateIssues, 5 * 60 * 1000);
updateIssues();

setInterval(updateUser, 60 * 60 * 1000);
updateUser();
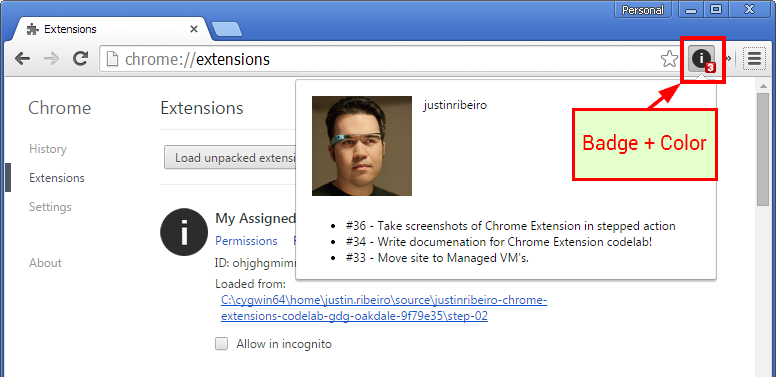
Since we're working in the background, it would be helpful to know when issues are available. We can use the chrome.browserAction.setBadgeText and chrome.browserAction.setBadgeBackgroundColor to display the number of issues on the browser action button:
// Get one: https://github.com/settings/applications
var githubToken = "YOUR_PERSONAL_TOKEN";

function updateUser() {
  GitHub.getMe(githubToken).then(function (me) {
    chrome.storage.local.set({
      user: me
    });
  });
}

function updateIssues() {
  GitHub.getMyIssues(githubToken).then(function (issues) {

    chrome.storage.local.set({
      issues: issues
    });

    chrome.browserAction.setBadgeBackgroundColor({
      color: '#F00'
    });

    chrome.browserAction.setBadgeText({
      text: '' + issues.length
    });

  });
}

//
// Grab issues every 5 minutes
//
setInterval(updateIssues, 5 * 60 * 1000);
updateIssues();

//
// Grab user info every 60 minutes
//
setInterval(updateUser, 60 * 60 * 1000);
updateUser();
Since we're now doing work in the background, we also need to update the popup.js so that we can use the locally stored data:
chrome.storage.local.get(['user', 'issues'], function(data) {
  //  YOUR CODELAB TASK:
  //    set username

  //  YOUR CODELAB TASK:
  //    set avatar

  //  YOUR CODELAB TASK:
  //    set issue list
});
When we've completed the above implementation, we should now have a badge:
Stuck? Check the step-03 folder for a solution.
Adding options on context menu
While defining our token in our code might be simple for us, if we have other users, that would be an issues. We can instead add an options menu to our extension. Let's start by creating an options.html and options.js:
➜ ~ touch options.html
➜ ~ touch js/options.js
Now, let's update our manifest with the options_page property:
{
  "manifest_version": 2,
  "name": "My Assigned Issues",
  "version": "1.0",
  "icons": {
    "19":"img/icon-19px.png",
    "38":"img/icon-38px.png",
    "64":"img/icon-64px.png",
    "128":"img/icon-128px.png"
  },
  "browser_action": {
    "default_icon": {
      "19":"img/icon-19px.png",
      "38":"img/icon-38px.png"
    },
    "default_popup": "popup.html"
  },
  "permissions": ["storage", "https://avatars.githubusercontent.com/"],
  "background": {
    "scripts": ["js/github_api.js", "js/background.js"]
  },
  "options_page": "options.html"
}
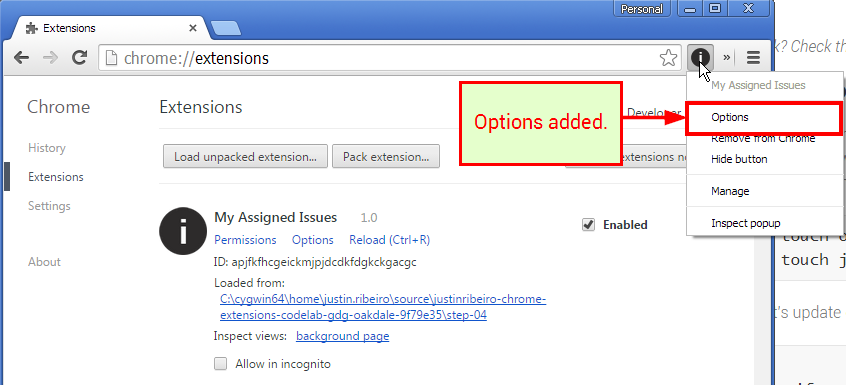
When right-clicking on our icon, you'll see a new option, "Options".
We can add some structure so that we can save data:
<html>
<head>
<meta charset="utf-8">
<title>Options</title>
<link rel="stylesheet" href="css/popup.css">
</head>
<body class="container">
  <h2>Options</h2>
  <p>Generate a Personal Access Token via Github: <a href="https://github.com/settings/applications">https://github.com/settings/applications</a>.</p>
  <form>
    <label for="githubToken">Github Token</label>
    <input id="githubToken" type="text">
    <button id="save" type="button">Save</button>
  </form>
  <script src="js/options.js"></script>
</body>
</html>
Nothing too exotic, just a basic form:

Now let's write some code to save that options data:
var githubToken = document.getElementById('githubToken');
var saveButton = document.getElementById('save');

// save our Github token
saveButton.addEventListener('click', function() {
  chrome.storage.local.set({
    githubToken: githubToken.value
  }, function() {
    //force background page to reload data
    chrome.extension.getBackgroundPage().updateUser();
    chrome.extension.getBackgroundPage().updateIssues();
  });
});

// get our Github token
chrome.storage.local.get('githubToken', function(data) {
  if(data && data.githubToken) {
    githubToken.value = data.githubToken;
  }
});
Tip: Instead of using chrome.extension.getBackgroundPage(), you could also implement chrome.storage.onChanged.addListener() on the background page to listen for changes to the value.
Great! Now we can update our background.js to look for that value:
function updateUser() {
  chrome.storage.local.get('githubToken', function(data) {
    if(data && data.githubToken) {

      GitHub.getMe(data.githubToken).then(function (me) {
        chrome.storage.local.set({
          user: me
        });
      });
    }
  });
}

function updateIssues() {
  chrome.storage.local.get('githubToken', function(data) {

    if(data && data.githubToken) {

      GitHub.getMyIssues(data.githubToken).then(function (issues) {

        chrome.storage.local.set({
          issues: issues
        });

        chrome.browserAction.setBadgeBackgroundColor({
          color: '#F00'
        });

        chrome.browserAction.setBadgeText({
          text: '' + issues.length
        });

      });
    }
  });
}
Stuck? Check the step-04 folder for a solution.
Whoo hoo! You did it!
Congratulations! You have completed the basics of this codelab! Have some extra time? Things for consideration:
- Make it pretty. Use your framework of your choice or just write some CSS.
- Use the Yeoman Chrome Extension generator to quickly setup a build environment with all the Grunt fixings.
- Build the future: use Polymer and some web components.
- Build even more on the API. The GitHub API is extensive